Disclaimer: As an Amazon affiliate, I may earn a small percentage from qualifying purchases. This is at no extra cost to you. Learn more here.
Looking for wood turning project ideas? Do you enjoy gardening? Or know someone else who does? Dating back to the Roman times, a garden dibber is a useful tools for gardeners. They help plant seeds and more at the correct depth. Make a garden dibber for your garden or as a gift for someone else.
| Project: | Garden Dibber |
| Skill level: | Beginner |
| Project time: | 1 hour or less |
Methodology & Approach
Conception & Design
My wife and I have a garden and she’s been asking for me to turn a garden dibber for her to use. I added it to my project list. I had her show me a few pictures of designs she liked. We also discussed how the dibber would be used.
Since it is used to make holes in the garden bed for planting seeds, seedlings or small bulbs the tapered point is helpful. Not all dibbers come to a point. And some come to a sharper point but more on that later.
Also, the handle should be comfortable and manageable for pushing in and pulling out of dirt. Dibber handles can be T-shaped, L-shaped or more rounded like the design she selected.
The markings along a dibber are important too. They should be at set intervals to help the gardener gauge the depth at which they are inserting the dibber. The taper of the dibber is also helpful here since typically larger plantings like bulbs go deeper than small seeds. In this case, the deeper you push the dibber, the wider the hole.
Specifications
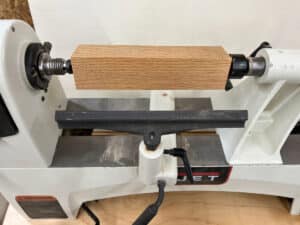
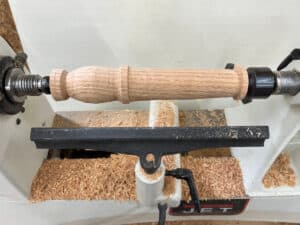
I free-formed this garden dibber on my JET 1221VS wood lathe. I used a piece of red oak scrap wood I already had. My selection came down to a matter of size. Dibbers come in different sizes. Some are smaller and thinner, almost pen-like. And some are larger but I don’t recommend going too much bigger than the one I made.
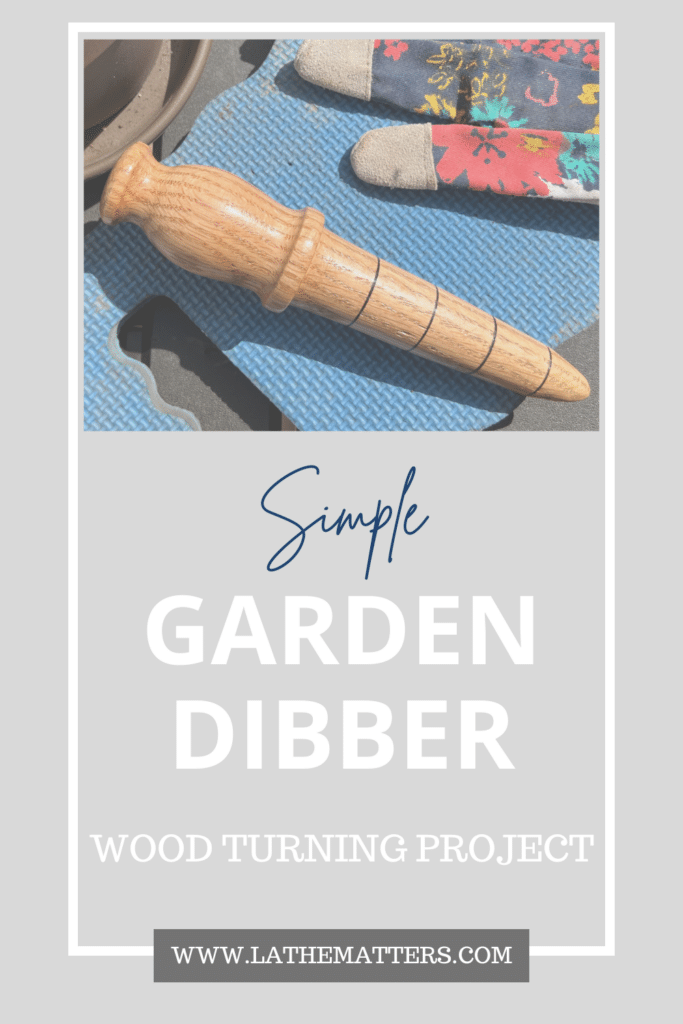
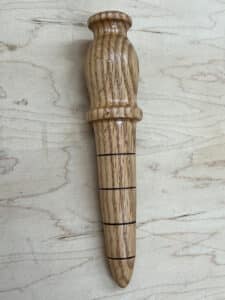
The finished garden dibber I made here is about 8-½” long and about 2” in diameter at its widest point (which is in the handle). I actually wanted the taper to be one inch longer but I didn’t leave myself enough buffer on the end to work with and make that happen. So I updated the materials and process notes below to allow for that.
The taper design is pretty simple and straightforward. So I added detail throughout the handle. This handle design fits comfortably in the hand and allows a few different ways to hold and operate the piece.
The bottom of the handle has a distinct edge before it tapers to a soft point. The lines I burned in are at 1” intervals. I didn’t go too deep on those so dirt doesn’t get stuck and build up in them. Overall this simple design is easy to use, keep clean, and should last for years and years of gardening.
Garden Dibber Materials
Assuming you have your lathe, standard set of turning tools and accessories, here’s what else you might need:
- Wood Blank – Any food-safe scrap wood in your shop that measures at least 10”x2”x2” will do.
- Ruler – I assume you have some sort of measuring device around your shop. Whether it be a straight ruler, a ruler on your square or a tape measure. It’s very important to this project’s intended use so I’m highlighting it here.
- Wire Burning Kit – This is a great project for trying wood burning with wire.
- Food-safe Finish – I used mineral oil and beeswax.
Why choose a food-safe wood and finish? Organic materials and finishes are ideal for gardening.
New to turning and looking for a wood lathe? Check out our wood lathe review posts below:
How to Turn a Garden Dibber
This overview of steps assumes at least a basic understanding of turning a project on a lathe and basic lathe safety:
- Cut to length – Measure your chosen piece of wood and cut to the desired length, if needed.
- Find & mark the center – If your piece isn’t squared off, grab your center finder tool and locate the center on each end.
- Securely mount to lathe
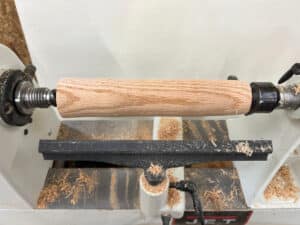
- Rough into a cylinder – Once the piece is secure, you are ready to start the lathe and rough the piece into a cylinder shape with a Roughing Gouge. I actually just use my large square tungsten bit.
- Find and mark the end buffer – As I shared above, I wish I had left more buffer on my workpiece. So if I were doing this again, I’d go ahead and mark off ¾” in from the end of the taper side and ½” in on the end of the handle side.
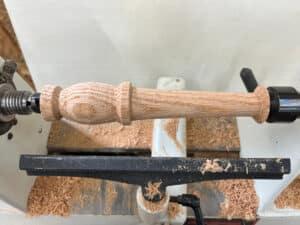
- Start shaping – I usually free-hand the shaping. However, in this case, you will want to know how long you want the dibber. I recommend a minimum of 5” (I wanted 6” but again, didn’t have enough buffer) from where the tip will be to the base of the handle. Make a distinction between the dibber and the handle. As a guide, you can mark off these sections for the design with a pencil. I started my shaping by cutting in the base of the handle. That way I knew my taper work would happen below that and I could free-hand the handle design above that. You can also stop the lathe and measure diameters long the way, until you have what you’re looking for.
- Final shaping – For the tip of the taper, you can bring it to a sharper point than I did. Remember, I was shooting for a 6” taper but had to settle for 5” so I just worked with what I had so at least the measurement lines would work out. However, too sharp or too fine a point could break off in the coming steps or after finishing which would then break the final seal. This is just something to be mindful of during the process.
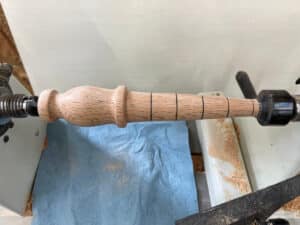
- Wire burning – Add this detail to the taper before you’re ready to sand. Be sure these lines are at the correct measurement intervals so the gardener can rely on them for the depths they need. To do this, grab a ruler and pencil. Turn the lathe speed down so the piece slowly rotates. Carefully line your ruler up, parallel to the taper end of the piece. It might be closer to the taper at the handle end and farther from the tip end. That’s what you want for the most accurate markings. The ruler should not be against the piece for these measurements. Not only is that very unsafe, but it will produce less precise measurements. And then at each interval you want, just move the pencil tip straight in to touch it to the piece and a line will be drawn for you as it rotates.
- Ends – Remember to keep your parting ends as close as comfortable. This is good to check in on before the sanding stage. Use your parting tool or a diamond tip, or whichever tool works for you. Because it’s a long piece, you’ll leave some meat on and then saw off the remainder. I try to leave just enough that it won’t fly off while spinning and shouldn’t take more than 30 seconds of final sanding.
- Sand – I don’t enjoy sanding. The lathe helps make quick work of this step for the most part.
- Parting – Your piece is almost done. It’s time to part it off. Turn the lathe off and use your parting tool of choice. I like to use my Japanese pull saw to cut the workpiece off the lathe.
Finishing
Now that your piece is off the lathe, all that’s left is final sanding and polishing. Sand down the nubs on either end.
Then, using a food-safe mineral oil, polish the piece. Finish with a coat of beeswax.
Since this will be used in gardening, you want something food-safe that won’t flake off into your soil. The mineral oil is penetrating, and the beeswax is a light protectant for water. Plus these two finishes are easy to reapply every once in a while if it looks like it needs it.
Always think of the project’s purpose and use. A bad finish choice and application can ruin your project and make it a pain to fix.
Finally, sweep up all those wood shavings and bag them to give to your gardener along with their new dibber. Sawdust and wood shavings are common as composting material or as mulch especially when winterizing garden beds and protecting any overwintering plants like garlic.
Want more project ideas like one sent straight to your inbox? Be sure to sign up for our newsletter below!